


![Select Crochet Clothing Ideas: [Best Crochet Fashion] Crochet Clothing Ideas](https://royalblue-leopard-445803.hostingersite.com/wp-content/uploads/2025/07/Crochet-Clothing-Ideas-Best-Crochet-Fashion-in-2025-1-1.jpg)


A provisional cast-on establishes a temporary beginning edge in knitting, enabling easy access to live stitches afterward. It’s essential for projects that need smooth joins, such as hems, cowls, or matching scarves, or for knitting in reverse. To handle it, you’ll utilize smooth scrap yarn in a different color. Usually, you create a chain and then work your main yarn stitches into the back bumps of that chain. Once you’re prepared to utilize the starting stitches, gently unravel the crocheted chain and position the revealed live stitches onto your needle. This method offers a smooth, adaptable base and removes heavy seams, functioning as a valuable asset for elegant finishing in your knitting endeavors. Still feeling unsure? Don’t worry. Below, we’ve outlined exactly how to work a provisional cast-on with a step-by-step guide. Keep reading!
In This Post
- What Is a Provisional Cast-On in Knitting
- When to Use a Provisional Cast-On
- Materials You’ll Need For Knitting Provisional Cast-On
- Step-by-Step: How to Do a Provisional Cast-On Using a Crochet Chain
- How to Do a Provisional Cast-On Without Crochet Hook (Using Waste Yarn)
- Provisional Cast-On In The Round
- How to Undo the Provisional Cast-On
- Common Projects That Use Provisional Cast-On
- FAQs About Provisional Cast-On
- In Closing
What Is a Provisional Cast-On in Knitting
A provisional cast-on creates a temporary starting edge using waste yarn. This enables you to conveniently take it off afterward, exposing live stitches that can be returned to the needles. It’s perfect for tasks requiring smooth connections (such as hems or scarves) or when you’ll be knitting in the reverse direction. Just gather the visible stitches and keep knitting for a neat, adaptable edge.
When to Use a Provisional Cast-On
Use a provisional cast-on when you need live stitches later. Perfect for seamless joins, symmetrical shawls, folded hems, or toe-up socks.
Here are the best ways of knitting in there. You can use a provisional cast-on:
1. Seamless Joins:
Utilize this when you want to link two parts discreetly without a prominent seam. It’s ideal for putting borders on scarves or blankets once the primary knitting is completed. You’ll appreciate it for seamlessly connecting sweater shoulders—no sewing needed! Moreover, it forms an unbroken material where the connection vanishes.
2. Symmetrical Projects:
Ever knit a shawl where the cast-on edge looks totally different from the bind-off? That’s when provisional cast-on saves the day. You’ll start with temporary stitches, knit the body, then work the exact same border on both ends. This gives you perfect mirror symmetry from top to bottom. No more guessing how to recreate that cast-on look later!
3. Hems & Cuffs:
Want that clean, folded edge on sweaters or hats? Knit your hem with scrap yarn first, then switch to main yarn for the body. Later, you’ll unpick the Provisional cast on with scrap yarn to reveal live stitches and knit the facing inward. What you get is a professional hem that lies flat without bulky seams.
4. Toe-Up Socks:
Most socks start at the cuff, but toe-up socks begin at the toes with provisional stitches. As you knit upward, you shape the toe and foot normally. When you’re ready for the cuff, just unravel the scrap yarn at the toe. Now you’ve got live stitches ready for grafting or adding a decorative edge.
5. Mistake Recovery:
We’ve all been there: you finish a project and realize the cast-on edge is too tight or messy. With a provisional cast-on, you can undo just that edge without frogging everything.
Materials You’ll Need For Knitting Provisional Cast-On
Provisional cast-on lets you start knitting with temporary stitches. Later, you remove them to add borders or join pieces seamlessly. It’s easier than it sounds and also useful.
Here are the materials that you need for knitting a provisional cast-on. Including –

- Knitting Yarn: The yarn specified in your knitting pattern. This will form the visible portion of your project. Ensure it matches the weight and fiber requirements of your design. No special preparation is needed beyond standard winding or skeining.
- Scrap Yarn: A sleek, non-textured thread in a color that contrasts with your primary yarn. Cotton or acrylic is most effective. Steer clear of yarns that are fuzzy, textured, or dark-hued. You will require about 10–15 yards—sufficient to cast on your stitches along with a 6-inch tail.
- Knitting Needles: Just grab the needles your pattern recommends for your main yarn. Straight, circular, or double-pointed? Doesn’t matter—whatever you normally use works here. No need to buy or switch anything special.
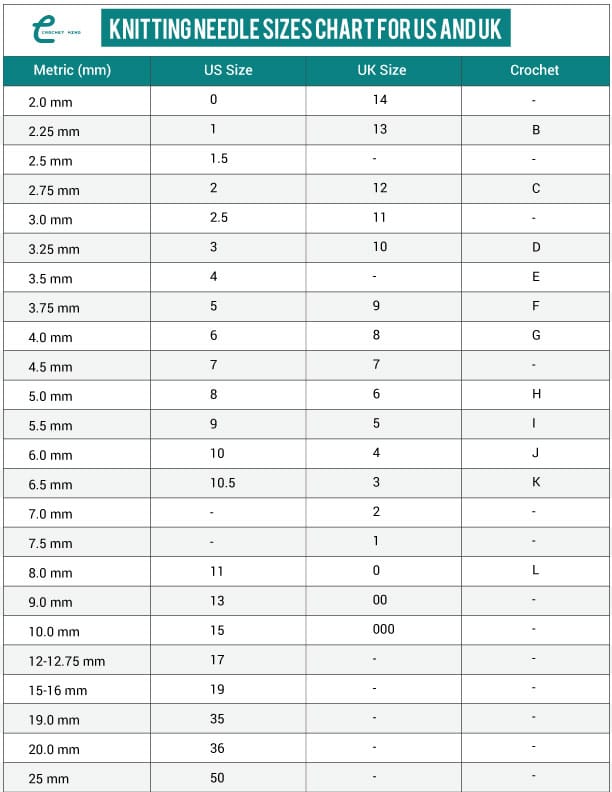
- Crochet Hook (Optional): This is only if you’re using the crochet chain method. Pick a hook close to your needle size—like a US 7 if you’re using US 8 needles. You can skip this, but it makes picking up stitches way easier when you start.
- Darning Needle: Required for removing the scrap yarn later. Use a blunt-tipped needle with an eye large enough for your scrap yarn. Keep it nearby when you’re ready to expose live stitches.
Step-by-Step: How to Do a Provisional Cast-On Using a Crochet Chain
Here are the steps on how to do a provisional cast on using a crochet chain. Including –
Step 1: Start with a Slip Knot
First things first, tie a simple slip knot with the yarn you’re using for the cast-on. Just like you’d start regular crochet.

Step 2: Crochet a Little Chain:
Pick up your crochet hook. Now, chain 3 or 4 stitches – don’t sweat counting them perfectly. Yarn over the hook and pull through the slip knot loop for your first chain. Then just keep yarning over and pulling through each new loop.

Step 3: Place the Needle
Now, take your knitting needle and slide it right between the working yarn (the part going to your ball) and that last chain stitch you just made.

Step 4: Lock the Needle In Place
Make one more chain stitch with your crochet hook. This little chain is what actually holds your knitting needle snugly in place.

Step 5: Wrap the Yarn Over the Needle
Now, you need to wrap the working yarn over the knitting needle and move it toward the back.

Step 6: Add Another Chain
In this step, make one more chain stitch with your crochet hook. This secures that yarn over you just put on the needle.

Step 7: Keep Repeating the Steps
Just keep doing those two steps over and over. Stop when you’ve got all the stitches you need on your needle.

Step 8: Reach Your Stitch Count
Continue performing those two actions until you have the required number of stitches on your needle.

Step 9: Start Knitting
Now just knit across those provisional stitches however your pattern tells you to. Or hey, if you’re winging it? Do whatever feels right!

How to Do a Provisional Cast-On Without Crochet Hook (Using Waste Yarn)
Ever wanted to start your knitting project with a cast-on that’s temporary, flexible, and doesn’t require extra tools like a crochet hook? The single needle provisional cast-on with waste yarn is the perfect choice for you. Perfect for knitters who love simplicity. This method lets you create a removable cast-on edge using just one knitting needle and some waste yarn.
Here are the steps on how to Single needle provisional cast on without a crochet hook & with waste yarn:
Step 1: Prepare the Yarns
Grab scrap yarn longer than your cast-on edge. Make a slipknot with your working yarn, leaving an 8” tail, and pop it on your needle. Hold the needle in your right hand. Pinch the scrap yarn tail between the working yarn and needle with your thumb and middle finger. Ready!

Step 2: Position and Wrap Yarns
Hold the needle and yarn tails in your right hand. Let both yarns hang on the left. Put the scrap yarn behind and above the working yarn. With your left hand, pull the working yarn behind the scrap yarn and up over the needle’s front. You’ve got your first stitch!

Step 3: Wrap the Working Yarn
Take your working yarn and loop it over the needle. Pull it down the back. Then, bring it over the scrap yarn’s front again. That’s another stitch done! The scrap yarn stays below, holding your place for later when you unzip it.

Step 4: Secure and Repeat
Maintain the new loop on your right-hand needle securely by gently pressing it with a finger to stop it from sliding off. This finishes a single cast-on stitch. Proceed with these steps until you have the necessary number of stitches on your needle.

Provisional Cast-On In The Round
Want to knit a provisional cast-on in the round? It’s simple and uses the same crochet hook method! Just cast on all stitches to one needle using your crochet hook and waste yarn, as you would for flat knitting. Then, spread those stitches across 3 or 4 double-pointed, circular, or interchangeable needles to start knitting in the round.

How to Undo the Provisional Cast-On
Here are the steps on how to undo the provisional cast-one. Including –
Step 1: When ready to release your provisional cast-on, slide the tip of your knitting needle into the right leg of each live stitch sitting just above the contrasting waste yarn. Work methodically along the edge, taking care to pick up every single stitch exactly once. Be especially vigilant at the very edges to prevent skipping stitches or accidentally inserting the needle into the same stitch twice.

Step 2: Find the little knot at the end of your crocheted chain. Gently undo this knot. Then, slowly pull out the contrasting yarn along the edge.

Common Projects That Use Provisional Cast-On
Provisional cast-ons shine in projects needing seamless beginnings or reversible ends. Common uses include hems, symmetrical scarves, toe-up socks, shawls with mirrored borders, and joining pieces invisibly. This technique unlocks elegant finishing and versatile construction possibilities.
Here are the common projects that use a provisional cast-on. Including –
1. Shawls & Scarves
You’ll love this for projects where both ends need identical borders. Start with provisional stitches, knit the body, then work the exact same lace or edging on both ends. It’s especially useful for crescent shawls where symmetry matters.
2. Modular Knitting Projects
When working with blocks or panels, provisional cast-on lets pieces connect smoothly. There’s no need to bind off and sew later. Instead, stitches are picked up directly, creating a clean join. This method keeps the fabric stretchy and unified.
3. Reversible Blankets or Afghans
You can also use this technique for those projects that are viewed from both sides like reversible blankets or afghans. The cast-on allows knitting from the center outward or attaching matching borders. It avoids unsightly seams and creates a neat, uniform edge. It’s ideal for heirloom-quality pieces.
4. Lace Shawls with Borders
Provisional cast-on on also used in lace shawls. With this technique, you can add the borders of lace shawls at last. The method prevents awkward joins or breaks in the design. It also makes blocking and shaping much easier.
5. Top-Down Sweaters
Provisional cast-on is frequently utilized at the shoulders or neckline in sweaters designed from the top down. It enables the knitter to knit in both directions for flawlessly balanced shaping. Sleeves and the body can be modified or extended later without beginning the project again. This adaptability is excellent for customizing clothing.
FAQs About Provisional Cast-On
What yarn works best for a provisional cast-on?
Smooth, contrasting waste yarn is ideal. It should be easy to remove without snagging. Cotton is a popular choice because it doesn’t felt or split easily, making unraveling quick and stress-free when accessing live stitches.
Can beginners learn the provisional cast-on easily?
Yes. With clear instructions and a bit of practice, beginners can master it. Starting with the crochet chain method or using a spare circular needle makes it easier to understand and achieve neat, consistent results.
When should I remove the provisional cast-on?
Remove it when the pattern instructs or when ready to work those live stitches. Carefully unravel the waste yarn, transferring each stitch onto a needle to avoid dropping or twisting stitches during the process.
In Closing
The provisional cast-on is a versatile knitting technique that allows stitches to remain live for later use, making it ideal for seamless joins, decorative edges, and flexible designs.
By mastering this method, beginners can expand their project possibilities and achieve professional-looking results. With a bit of practice, it becomes a valuable skill for sweaters, scarves, shawls, and more, offering both creativity and functionality in every knitted piece.


![The Best 30+ Free Crochet Cat Patterns [Beginner-Friendly Guide]](https://royalblue-leopard-445803.hostingersite.com/wp-content/uploads/2025/04/1-The-Best-30-Free-Crochet-Cat-Patterns-Beginner-Friendly-Guide.webp)


